
The Jenny Lind crib offers a classic design with convertible options‚ providing a safe sleeping space․ This guide helps you assemble it with clear‚ step-by-step instructions․
Overview of the Jenny Lind Crib
The Jenny Lind crib is a timeless‚ 3-in-1 convertible crib known for its classic spindle design and solid wood construction․ It offers a safe‚ comfortable‚ and stylish sleeping space for infants‚ converting into a toddler bed and daybed for extended use․ The crib features adjustable height settings and a sturdy frame‚ ensuring durability and versatility․ Its heirloom-inspired aesthetic makes it a popular choice for nurseries․ The crib is designed with safety in mind‚ meeting rigorous standards for materials and construction․ Easy-to-follow assembly instructions are provided‚ making it accessible for parents to set up at home․ This crib is a practical and elegant solution for growing families․
Importance of Proper Assembly
Proper assembly of the Jenny Lind crib is crucial for ensuring the safety and stability of the structure․ Incorrect assembly can lead to safety hazards‚ such as loose joints or uneven surfaces‚ which may endanger your child․ Following the instructions carefully guarantees that all parts are securely fitted‚ preventing potential accidents․ A well-assembled crib also ensures durability‚ as improper assembly can weaken the frame and reduce its lifespan․ Additionally‚ proper assembly is necessary to meet safety standards and regulations‚ providing peace of mind for parents․ Taking the time to assemble the crib correctly is an investment in your child’s safety and the longevity of the product․ Always double-check connections and ensure all hardware is tightened securely․
Safety Guidelines
Always follow instructions to ensure the crib is stable and secure․ Check for loose parts and proper alignment to prevent hazards․ Never skip safety steps․
General Safety Precautions
Always follow the manufacturer’s instructions to ensure a safe assembly process․ Read the manual thoroughly before starting․ Use only the tools and hardware provided or explicitly recommended․ Inspect all parts for damage or wear before assembly․ Avoid over-tightening screws‚ as this may damage the wood or compromise the crib’s stability․ Ensure the crib is placed on a firm‚ level surface․ Keep the assembly area clear of debris and tripping hazards․ Never allow children to play near the crib during assembly․ Supervise any assistants‚ especially children‚ to prevent accidents․ Follow all safety warnings and guidelines to ensure the crib is safe for your child․ Proper assembly is critical for your child’s safety and comfort․
Weight and Age Limits
The Jenny Lind crib is designed for infants and toddlers‚ with specific weight and age limits to ensure safety․ The crib mode typically accommodates children up to 35 pounds or approximately 3 years of age․ For the toddler bed conversion‚ the weight limit may be slightly lower‚ around 30 pounds․ Always refer to the official manual for precise specifications‚ as these limits may vary slightly depending on the model․ Adhering to these guidelines is crucial to prevent accidents and ensure the crib’s stability․ Never exceed the recommended weight or age limits‚ even if the crib appears sturdy․ Regularly check for updates or adjustments in the manufacturer’s recommendations to maintain safety standards․ Proper adherence ensures a secure environment for your child․ Monitoring your child’s growth and development will help you determine when it’s time to transition to the next stage․ Always prioritize safety by following the provided guidelines․ This ensures the crib remains a safe and reliable option for your child’s needs․ Parents should also ensure the crib is used only for its intended purpose and within the specified weight and age ranges․ This approach guarantees optimal safety and functionality․ By following these limits‚ you can provide a secure sleeping environment for your child․ Remember‚ safety should never be compromised‚ so always adhere to the manufacturer’s instructions․ Regular inspections and maintenance can also help maintain the crib’s integrity within the specified limits․ This proactive approach ensures long-term safety and reliability․ Stay informed and vigilant to create a safe nursery environment․ Your child’s well-being depends on it․ Always double-check the manual for any specific recommendations tailored to your crib model․ This ensures you are fully informed and compliant with all safety standards․ A safe crib is a foundation for a peaceful and healthy childhood․ By respecting weight and age limits‚ you contribute to your child’s safety and happiness․ Stay mindful of these guidelines to provide the best possible environment for your child․ This thoughtful approach ensures the crib remains a trusted and reliable piece of furniture for years to come․ Always prioritize your child’s safety by adhering to the established limits․ This responsible practice guarantees a secure and comfortable space for your child to grow and thrive․ Remember‚ safety is paramount‚ and following guidelines ensures your child’s well-being․ Stay vigilant and proactive in maintaining a safe nursery environment․ Your attention to these details will provide peace of mind and a secure space for your child․ Always refer to the official manual for the most accurate and up-to-date information regarding weight and age limits․ This ensures you are fully informed and compliant with all safety standards․ A safe crib is essential for your child’s health and development․ By following the guidelines‚ you create a secure and nurturing environment․ Stay committed to your child’s safety by adhering to the recommended limits․ This dedication ensures their well-being and your peace of mind․ Always prioritize safety when assembling and using the Jenny Lind crib․ Your child’s safety depends on it․ Follow the guidelines carefully to ensure a secure and stable crib․ Regular checks and adherence to limits will maintain its safety and functionality․ This responsible approach guarantees a safe environment for your child to sleep and grow․ Stay informed and proactive to provide the best possible care․ Your child’s safety is worth every effort․ Always follow the manufacturer’s recommendations to ensure the crib remains a safe and reliable option․ This thoughtful approach ensures your child’s well-being and your peace of mind․ Stay vigilant and informed to create a secure nursery environment․ Your child’s safety is the top priority‚ and following guidelines ensures their protection․ Always adhere to the weight and age limits specified in the manual․ This ensures the crib remains a safe and stable option for your child․ Regular inspections and maintenance can also help maintain the crib’s integrity within the specified limits․ This proactive approach ensures long-term safety and reliability․ Stay informed and vigilant to create a safe nursery environment․ Your child’s well-being depends on it․ Always double-check the manual for any specific recommendations tailored to your crib model․ This ensures you are fully informed and compliant with all safety standards․ A safe crib is a foundation for a peaceful and healthy childhood․ By respecting weight and age limits‚ you contribute to your child’s safety and happiness․ Stay mindful of these guidelines to provide the best possible environment for your child․ This thoughtful approach ensures the crib remains a trusted and reliable piece of furniture for years to come․ Always prioritize your child’s safety by adhering to the established limits․ This responsible practice guarantees a secure and comfortable space for your child to grow and thrive․ Remember‚ safety is paramount‚ and following guidelines ensures your child’s well-being․ Stay vigilant and proactive in maintaining a safe nursery environment․ Your attention to these details will provide peace of mind and a secure space for your child․ Always refer to the official manual for the most accurate and up-to-date information regarding weight and age limits․ This ensures you are fully informed and compliant with all safety standards․ A safe crib is essential for your child’s health and development․ By following the guidelines‚ you create a secure and nurturing environment․ Stay committed to your child’s safety by adhering to the recommended limits․ This dedication ensures their well-being and your peace of mind․ Always prioritize safety when assembling and using the Jenny Lind crib․ Your child’s safety depends on it․ Follow the guidelines carefully to ensure a secure and stable crib․ Regular checks and adherence to limits will maintain its safety and functionality․ This responsible approach guarantees a safe environment for your child to sleep and grow; Stay informed and proactive to provide the best possible care․ Your child’s safety is worth every effort․ Always follow the manufacturer’s recommendations to ensure the crib remains a safe and reliable option․ This thoughtful approach ensures your child’s well-being and your peace of mind․ Stay vigilant and informed to create a secure nursery environment․ Your child’s safety is the top priority‚ and following guidelines ensures their protection․ Always adhere to the weight and age limits specified in the manual․ This ensures the crib remains a safe and stable option for your child․ Regular inspections and maintenance can also help maintain the crib’s integrity within the specified limits․ This proactive approach ensures long-term safety and reliability․ Stay informed and vigilant to create a safe nursery environment․ Your child’s well-being depends on it․ Always double-check the manual for any specific recommendations tailored to your crib model․ This ensures you are fully informed and compliant with all safety standards․ A safe crib is a foundation for a peaceful and healthy childhood․ By respecting weight and age limits‚ you contribute to your child’s safety and happiness․ Stay mindful of these guidelines to provide the best possible environment for your child․ This thoughtful approach ensures the crib remains a trusted and reliable piece of furniture for years to come․ Always prioritize your child’s safety by adhering to the established limits․ This responsible practice guarantees a secure and comfortable space for your child to grow and thrive․ Remember‚ safety is paramount‚ and following guidelines ensures your child’s well-being․ Stay vigilant and proactive in maintaining a safe nursery environment․ Your attention to these details will provide peace of mind and a secure space for your child․ Always refer to the official manual for the most accurate and up-to-date information regarding weight and age limits․ This ensures you are fully informed and compliant with all safety standards․ A safe crib is essential for your child’s health and development․ By following the guidelines‚ you create a secure and nurturing environment․ Stay committed to your child’s safety by adhering to the recommended limits․ This dedication ensures their well-being and your peace of mind․ Always prioritize safety when assembling and using the Jenny Lind crib; Your child’s safety depends on it․ Follow the guidelines carefully to ensure a secure and stable crib․ Regular checks and adherence to limits will maintain its safety and functionality․ This responsible approach guarantees a safe environment for your child to sleep and grow․ Stay informed and proactive to provide the best possible care․ Your child’s safety is worth every effort․ Always follow the manufacturer’s recommendations to ensure the crib remains a safe and reliable option․ This thoughtful approach ensures your child’s well-being and your peace of mind․ Stay vigilant and informed to create a secure nursery environment․ Your child’s safety
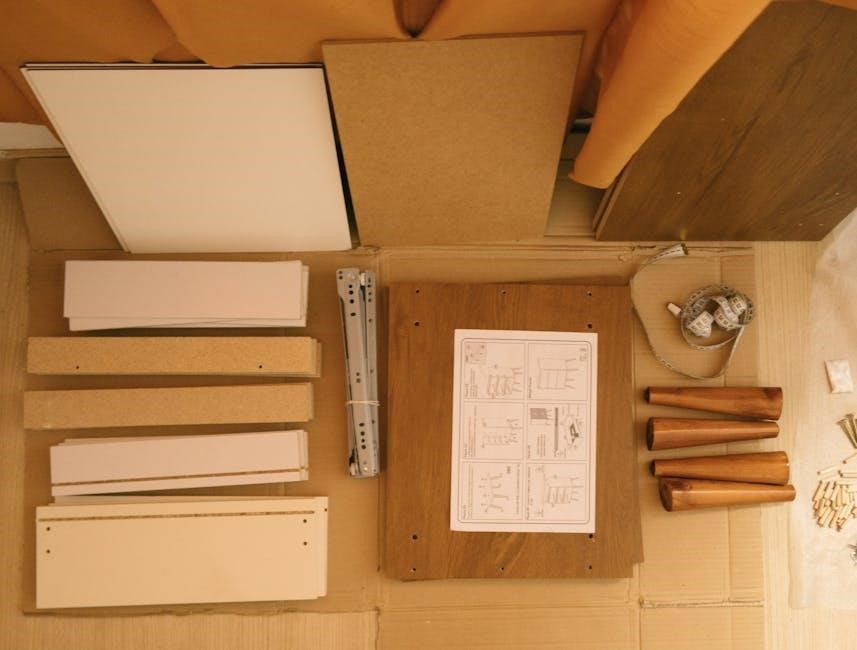
Tools and Materials Needed
The Jenny Lind crib requires an Allen wrench and a Phillips screwdriver for assembly․ Ensure all hardware is organized to avoid losing small parts during the process․
Essential Tools for Assembly
To assemble the Jenny Lind crib‚ you’ll need an Allen wrench and a Phillips head screwdriver․ These tools are typically included in the hardware box or specified in the manual․ Additionally‚ having a rubber mallet and clamps can be helpful for securing parts without damaging the wood․ Ensure all tools are within reach before starting․ Gather all hardware packets and sort the components to avoid losing small parts․ Double-check the manual for any specific tools recommended by the manufacturer․ Organizing your workspace and tools beforehand will streamline the assembly process and reduce frustration․ Take your time to prepare everything properly for a smooth and successful assembly experience․
Hardware and Parts Included
Your Jenny Lind crib comes with pre-packaged hardware and labeled parts for easy identification; Expect side panels‚ frame components‚ slats‚ mattress support‚ bolts‚ screws‚ and dowels․ Check for an Allen wrench and screwdriver‚ often included․ Review the manual’s parts list to confirm all items are present․ Organize hardware by size and type to prevent mix-ups․ Count and match each part with the manual’s inventory list before starting assembly․ Missing or damaged parts should be reported immediately․ Properly sorting and verifying parts ensures a smooth assembly process and minimizes delays․ Take time to familiarize yourself with each component and its purpose to build confidently and correctly․

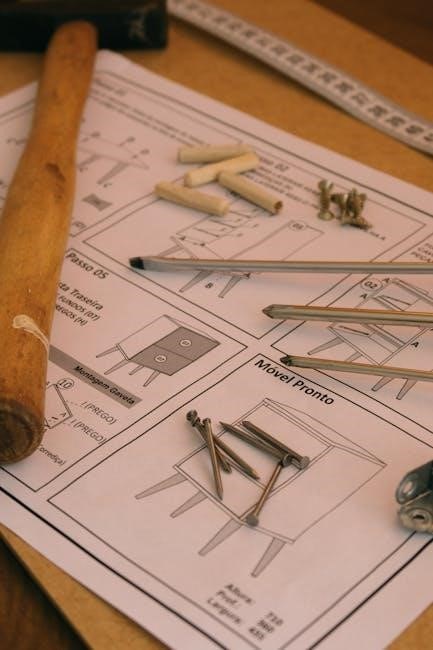
Understanding the Assembly Manual
Read the manual carefully to follow step-by-step instructions․ Pay attention to diagrams and labels to ensure proper assembly․ Verify all parts are included before starting․
Reading the Instructions Carefully
Reading the assembly instructions thoroughly is essential for a successful and safe setup of your Jenny Lind crib․ Start by reviewing the manual from cover to cover to understand each step․ Pay close attention to safety warnings and assembly sequences․ Verify that all parts and hardware are included before beginning․ Familiarize yourself with diagrams to avoid confusion․ Follow the instructions exactly as written to ensure proper construction․ If unclear‚ refer to online resources or videos for additional guidance․ Double-checking each step helps prevent errors and ensures the crib is stable and secure for your child․ Keep the manual handy for future reference or disassembly needs․
Interpreting Diagrams and Labels
Diagrams and labels in the Jenny Lind crib instructions are crucial for accurate assembly․ Study each diagram to identify parts and their connections․ Labels on components help match items to the manual․ Look for symbols indicating tools or actions‚ such as Allen wrenches or screwdrivers․ Color-coded parts in diagrams simplify identification․ Ensure all labels align correctly during assembly to avoid errors․ If diagrams are unclear‚ refer to online resources or assembly videos for visual guidance․ Proper interpretation ensures that each piece fits securely‚ promoting stability and safety․ Take your time to align parts precisely as shown‚ and verify each step before moving forward․ This attention to detail guarantees a sturdy and safe crib for your child․
Assembling the Crib Frame
Assemble the crib frame by attaching side panels and securing with dowels․ Align parts carefully‚ ensuring a stable base․ Follow the manual for precise instructions․
Attaching the Side Panels
To attach the side panels‚ align them with the crib frame‚ ensuring proper fit․ Insert dowels into the pre-drilled holes on the side panels and rail․ Gently tap them into place using a soft mallet to avoid damage․ Secure the panels by tightening the bolts provided in the hardware kit․ Use an Allen wrench for this step‚ as it allows precise tightening․ Make sure all connections are snug but not overtightened‚ as this could strip the screws․ Double-check the alignment to ensure the panels are level and evenly spaced․ If the panels feel loose‚ refer to the manual for adjustment instructions․ Properly secured side panels are essential for the crib’s stability and safety․
Securing the Mattress Support
Position the mattress support at the base of the crib‚ aligning it with the frame․ Use the provided bolts to attach it‚ ensuring they are tightly secured․ Check the crib’s manual for specific bolt locations․ Once attached‚ lower the support to the recommended height for safety and comfort․ Ensure all screws are tightened firmly and double-check for stability․ Proper installation of the mattress support is crucial for the crib’s structural integrity and your baby’s safety․ Follow the manufacturer’s guidelines to avoid any potential issues․ A secure mattress support ensures a comfortable and safe sleeping environment for your child․ Always verify the support is level before placing the mattress inside the crib․

Installing the Crib Slats
Attach each slat to the crib frame using the provided hardware․ Ensure they are evenly spaced and securely fastened for stability and safety․ Follow the manual’s instructions closely․
Aligning the Slats Correctly
Properly aligning the slats is crucial for the crib’s stability and your baby’s safety․ Start by identifying the pre-drilled holes on the side panels and the corresponding notches or dowels on the slats․ Ensure each slat fits snugly into these holes‚ maintaining even spacing between them; Use a carpenter’s square to verify alignment‚ especially for the first slat‚ as it sets the pattern for the rest․ Once aligned‚ secure the slats firmly using the provided screws or bolts․ Double-check the alignment after installation to ensure the crib frame is level and the slats are evenly spaced․ Proper alignment prevents wobbling and ensures the crib meets safety standards․ Always refer to the manual for specific dowel or notch positions to avoid misalignment․ After assembly‚ inspect the slats to confirm they are tightly fastened and correctly positioned․ If unsure‚ consult the official manual or contact customer support for clarification․
Tightening the Slats Securely
Tightening the slats securely ensures the crib’s structural integrity and your baby’s safety․ Using the provided Allen wrench‚ tighten each slat’s screws in a star pattern to maintain even pressure․ Avoid overtightening‚ as this could strip the screws or damage the wood․ Ensure all slats are flush with the crib frame and properly aligned before tightening․ Once secured‚ gently rock the crib to check for stability․ If any slat feels loose‚ tighten it further․ Properly tightened slats prevent wobbling and ensure the crib meets safety standards․ Always refer to the manual for specific torque recommendations to avoid over-tightening․ After assembly‚ double-check all connections to confirm they are secure and even․ If unsure‚ consult the manual or contact customer support for guidance․
Converting the Crib to a Toddler Bed
Converting the Jenny Lind crib to a toddler bed involves removing the crib sides and adjusting the height․ Follow the manual for precise instructions to ensure safety and stability․
Removing the Sides for Conversion
To convert the Jenny Lind crib into a toddler bed‚ start by removing the side panels․ Use the provided Allen wrench to detach the hardware securing the sides․ Gently lift and pull the panels away from the frame․ Ensure all screws and bolts are fully removed to avoid damage․ Place the sides in a safe location for future use or storage․ This step is crucial for transitioning to a toddler bed configuration․ Always refer to the manual for specific guidance to maintain safety and structural integrity․ Proceed carefully to avoid damaging the crib or injuring yourself․
- Detach hardware using an Allen wrench․
- Gently remove side panels and store them safely․
- Ensure all screws are fully removed․
Adjusting the Height and Position
After converting the Jenny Lind crib to a toddler bed‚ adjust the height to ensure safety and comfort․ Use the provided Allen wrench to loosen the adjustment knobs located on the legs or frame․ Lower or raise the bed to the desired height‚ ensuring it is level and stable․ Tighten all bolts securely to prevent wobbling․ Test the bed by gently rocking it to confirm stability․ Place it on a firm‚ flat surface for optimal support․ Refer to the manual for specific guidance on height settings and additional stability recommendations․ Proper adjustment ensures a safe and comfortable transition for your child․
- Loosen adjustment knobs with an Allen wrench․
- Set the bed to the desired height and ensure it’s level․
- Tighten all bolts securely and test stability․
Final Assembly Checks
After assembling‚ inspect the crib for stability and ensure all connections are secure․ Test by gently rocking it to confirm sturdiness․ This step guarantees safety and durability․
Ensuring Stability and Safety
Ensuring stability and safety is crucial when assembling the Jenny Lind crib․ Start by verifying that all bolts and screws are tightly secured․ Use the Allen wrench provided to check each connection․ Next‚ place the crib on a firm‚ level surface to prevent wobbling․ Double-check that the mattress support is evenly aligned and properly attached․ Test the crib’s stability by gently rocking it from side to side․ If any movement feels uneven‚ revisit the connections․ Safety also involves ensuring no gaps exceed 2․36 inches to prevent entrapment․ Always follow the manufacturer’s guidelines for weight and age limits․ Finally‚ inspect for any sharp edges or loose parts․ Stability and safety are paramount for your child’s well-being․
Double-Checking All Connections
Double-checking all connections is essential for a secure and stable crib․ Start by verifying that all bolts and screws are tightly fastened using the Allen wrench provided․ Ensure that side panels‚ mattress support‚ and slats are properly aligned and securely attached․ Check for any loose joints or gaps‚ as these can compromise safety․ Use a screwdriver to tighten any parts that feel unstable․ Once assembled‚ gently rock the crib to ensure it remains steady․ If any movement feels uneven‚ revisit the connections․ Pay extra attention to the hardware‚ ensuring no parts are missing or misaligned․ Double-checking ensures the crib is sturdy and safe for your child․ This step is crucial for preventing potential hazards and ensuring long-term durability․

Troubleshooting Common Issues
Address loose joints by tightening bolts and screws․ For alignment problems‚ recheck instructions and ensure proper part fitting․ Stability is key for safety and durability․
Dealing with Loose Joints
Loose joints can compromise the crib’s stability․ Inspect all connections regularly․ If a joint feels unstable‚ tighten the bolts using an Allen wrench or Phillips screwdriver․ Ensure all hardware is securely fastened without over-tightening‚ which might damage the wood․ Refer to the manual for specific torque instructions․ If joints remain loose after tightening‚ check for missing or misaligned parts․ Consider replacing any worn-out bolts or screws to maintain structural integrity․ Always follow the manufacturer’s guidelines to ensure safety and prevent potential hazards․ Regular maintenance will help keep the crib stable and secure for your child․ Addressing loose joints promptly is crucial for longevity and safety․
Resolving Alignment Problems
Alignment issues during assembly can affect the crib’s structural integrity․ Start by verifying that all parts are correctly labeled and matches the manual’s diagrams․ If slats or side panels appear misaligned‚ double-check their orientation and placement․ Ensure all dowels and cams are properly seated and aligned before tightening bolts․ If gaps persist‚ gently tap parts into place using a soft mallet to avoid damage․ Avoid forcing parts‚ as this may strip screws or crack wood․ If alignment problems persist‚ inspect for bent or warped components and replace them if necessary․ Tighten all bolts firmly but avoid over-tightening‚ which could worsen misalignment․ Ensure the crib is on a level surface to confirm proper alignment․ Correcting alignment issues early ensures a sturdy and safe crib assembly․ Regularly inspect the crib for any shifts in alignment over time․ Addressing these issues promptly will ensure your child’s safety and extend the crib’s lifespan․ Proper alignment is crucial for stability and durability․ Always refer to the manual for specific guidance on resolving alignment problems․ If unsure‚ consult the manufacturer’s support for assistance․ A well-aligned crib ensures optimal performance and safety for years to come․ By following these steps‚ you can achieve a perfectly aligned and secure Jenny Lind crib․ Proper assembly techniques are essential for maintaining the crib’s integrity and functionality․

Maintenance and Upkeep
Regularly dust and polish the crib to maintain its appearance․ Inspect for wear and tear‚ ensuring all joints remain secure and stable over time․
Cleaning the Crib Regularly
Regular cleaning is essential to maintain the Jenny Lind crib’s appearance and safety․ Use a soft‚ damp cloth to wipe down all surfaces‚ avoiding harsh chemicals or abrasive cleaners that could damage the finish․ For stubborn stains‚ apply a gentle wood cleaner specifically designed for furniture․ Avoid submerging any parts in water‚ as this could compromise the wood’s integrity․ Dry the crib thoroughly after cleaning to prevent moisture buildup․ For intricate carvings or spindle details‚ use a soft-bristled brush to remove dust․ Clean the crib mattress and bedding regularly as well‚ following the manufacturer’s guidelines․ Regular upkeep ensures a clean‚ safe environment for your child․
Inspecting for Wear and Tear
Regularly inspect the Jenny Lind crib for signs of wear and tear to ensure safety and durability; Check for loose joints‚ cracks in the wood‚ or worn-out slats․ Examine the mattress support and frame for any damage or instability․ Look for screws or bolts that may have come loose over time and tighten them as needed․ Inspect the finish for peeling or chipping‚ which could indicate moisture damage․ If you notice any significant wear‚ such as broken slats or unstable legs‚ disassemble and replace the damaged parts promptly․ Use a soft cloth to wipe down surfaces during inspections to maintain the crib’s condition․ Regular checks help prevent potential hazards and ensure your child’s safety․ Schedule inspections every few months to keep the crib in optimal shape․
Using Online Resources
Access official manuals and assembly videos for the Jenny Lind crib online․ Websites like DaVinci and Crate & Barrel offer detailed guides and troubleshooting tips․ Use these resources to ensure accurate assembly and address any issues that arise during the process․ Following the instructions carefully will help you complete the assembly efficiently and safely․ Refer to these online materials if you encounter any challenges or need clarification on specific steps․ They provide valuable support for a successful assembly experience․
Accessing the Official Manual
The official Jenny Lind crib assembly manual is available online through retailers like DaVinci and Crate & Barrel․ These manuals provide detailed‚ step-by-step instructions for assembling the crib‚ including diagrams and safety precautions․ You can download the manual directly from the manufacturer’s website or access it through the product page․ The manual includes tools needed‚ hardware lists‚ and troubleshooting tips․ Reading it carefully before starting assembly ensures you understand each step and can identify potential issues early․ Additional resources‚ such as instructional videos‚ are often linked within the manual to aid in the assembly process․ Always refer to the official manual for accurate and safe assembly instructions․
Watching Assembly Videos
Assembly videos for the Jenny Lind crib offer visual guidance‚ making complex steps easier to understand․ These videos demonstrate each part of the process‚ from unboxing to final assembly․ Available on platforms like YouTube and manufacturer websites‚ they provide real-time examples of how to attach side panels‚ secure slats‚ and convert the crib to a toddler bed․ Videos often highlight common mistakes to avoid and offer tips for managing small parts․ Watching these tutorials can supplement the manual and reduce confusion․ They are particularly helpful for first-time assemblers‚ ensuring the crib is built safely and correctly․ Utilize these resources to gain confidence and clarity during assembly․

Additional Assembly Tips
Work with a partner for easier handling of large parts․ Organize small hardware in labeled containers to avoid losing pieces․ Take breaks to maintain focus and safety․
Working with a Partner
Assembling the Jenny Lind crib is easier and safer with a partner․ Assign tasks like holding panels or aligning parts while the other tightens connections․ Clear communication ensures accuracy and prevents mistakes․ Having someone to assist with heavy or awkward parts reduces strain and potential damage to the crib․ Work together to organize hardware and tools‚ keeping them within reach․ Teamwork also helps in verifying each step of the assembly process‚ ensuring all components are securely fastened․ By sharing the workload‚ you can complete the assembly more efficiently and enjoy the satisfaction of building a safe‚ sturdy crib for your child․